Drill Camera Controls Series 3

Welcome back to the 3-part series on MOTI Mobile drill controls. In this article the Drill Effects will be reviewed and explained. Utilizing these features, viewing and tracking the motion in the play is improved by the use of on-field annotation.

To recap, the review of the drill controls are divided into 3 parts. Topics for the 3 parts are:

  1. Animation Controls and Overview – Part 1 introduced the main
    control panel, the animation controls and the menu/control-panel buttons.
  2. Zoom Controls and Camera Views Menu– Part 2 covered both the
    zoom controls and the camera view menu that help with viewing the drill in different ways.
  3. Drill Effects (this article) – Part 3 covers the drill effects
    that are available to help visualize the workings of the drill.

Review

The first article introduced layout of the drill controls in the panel and described the functionality of each of the buttons and controls. The content of the this article will be used as a basis of this article. Read the first article if these concepts are unfamiliar or a refresher is needed.

The second article reviewed the Zoom Controls and Camera Views Menu menu. Read the first article if these concepts
are unfamiliar or a refresher is needed.

Controls Overview

As described in the first article, the drill controls are located at the
bottom of the screen and are always on-screen. The follow sections will refer to the image below using both the icon and the numbers for identification.

Drill Effects

Pressing drill effects button (number 1, in the Controls Overview section) will activate a pop-up control where the drill effects can be activated and colored. Each setting is applied immediately to the scene. To deactivate the pop-up control, press the drill effects button again or press any other button.

When the application is first installed, all the settings for the drill effects are off and set to the color black (see the above image). Changing the on/off state and color is fully customizable by the user and will be remembered between viewing different.

On/Off States

Each of the buttons (e.g. ShowRoutesTrails) is a toggle switch. Pressing on a one of the buttons will toggle the state of the effect off->on or on->off.

Off State – Below is the “off” state of a Routes button

On State – Below is the “on” state of a Routes button

Display Color

Each of the gray-bordered boxes next to the on/off state toggle switches is a button that will launch the Color Picker (see the follow section for more information). In the above image, all the colors are black.

Color Picker Button

The following explanations will reference the two images directly below.

The following are the effects that can be configured:

Featured Players and Featured Balls

Featured players/balls are defined by the author of the drill and are intended to show specific player/ball movements. The settings for “featured” players/balls supersede any settings for “all” player/balls.

Show option

When activated, a dais will appear beneath the player/ball and will move as the player/ball moves. The dais will always be attached to the ground (even if the ball is kicked in the air or the player jumps). Note that not all drills will have featured players or featured balls.

An example of a featured player is shown below with the Show option “on” and colored in “red”.

Routes and Trails options

These options will be reviewed in the “All Players and All Balls” section directly below.

All Players and All Balls

These settings will apply to all the players and all the balls in the scene (unless the options are superseded by the Featured Players or Featured Balls).

Routes option

This option will display the immediate past and the immediate future paths of the scripted player/ball as they move. In the above images, in the Drill Effects Pop-Up, the routes for the players are
turned “on” and have a turquoise color. The routes can be seen on the ground around the players.

Trails option

This option will display where the player/ball has been and will follow the player/ball as it moves. When a player/ball stops, the trail will disappear shortly thereafter. In the above images, in the Drill Effects Pop-Up, the trails for the balls are turned “on” and have a purplish color. The trails can be seen on the ground around the ball.

Color Picker

When one of the gray-bordered color squares in theDrill Effects Pop-Up is pressed the Color Picker Pop-Up will show. To dismiss
the Color Picker Pop-Up, press the “Cancel” button to discard the changes, or “OK” to keep the changes.

The color picker control set (numbers 1 through 6, directly above) shows the current color of the effect chosen. The parts of the color picker set are:

Title (number 1)

The title shows the effect that is being edited.

Saturation control (number 2)

Pressing anywhere in the colored area will change the color to be more or less intense (without changing the Hue). The Saturation marker (see 6, below) reflects the current setting.

Hue control (number 3)

Pressing anywhere in the rainbow area will change the color to be in a different area (without changing the Saturation). The Hue maker (see 7, below) reflects the current setting.

Cancel button (number 4)

Pressing this will close the pop-up and discard the changes that were made.

OK button (number 5)

Pressing this will close the pop-up and apply the changes that were made. The changes will be applied to the drill and will be reflected in both the drill and the color square next to the effect name (e.g. ShowRoutesTrails).

Saturation marker (number 6)

This marker shows the current saturation that is being displayed.

Hue marker (number 6)

This marker shows the current hue that is being displayed.

In Conclusion

The Drill Effects provide the user an improved
understanding of the motion of drill. Adjust the colors and state of the effects to pinpoint specific movements and players or balls.

Get the MOTI Soccer Training app:
MOTI Soccer for Android: https://motisports.com/google-soccer-app/
MOTI Soccer for iOS: https://motisports.com/apple-soccer-app/

Drill Camera Controls Series 2

Welcome back to the 3-part series on MOTI Mobile drill controls. In this
article the Zoom Controls and Camera View Menu
will be reviewed and explained. Utilizing these features, reviewing the
play from a multitude of angles and levels of detail is possible.

To recap, the review of the drill controls are divided into 3 parts. Topics
for the 3 parts are:

  1.  Animation Controls and Overview – Part 1 introduced the main
    control panel, the animation controls and the menu/control-panel buttons.
  2. Zoom Controls and Camera Views Menu (this article) – Part 2
    covers both the zoom controls and the camera view menu that help with
    viewing the drill in different ways.
  3.  Drill Effects – Part 3 will cover the drill effects that are
    available to help visualize the workings of the drill.

Review

The first article introduced layout of the drill controls in the panel and
described the functionality of each of the buttons and controls. The
content of the previous article will be used as a basis of this article.
Read the first article if these concepts are unfamiliar or a refresher is
needed.

Controls Overview

As described in the first article, the drill controls are located at the
bottom of the screen and are always on-screen. The follow sections will
refer to the image below using both the icon and the numbers for
identification.

Zoom Controls

Pressing zoom controls button (number 1, in the Controls Overview section) will activate a pop-up control
that can change the zoom of the camera. This allows the user to zoom in or
out while not moving the camera. To deactivate the pop-up control, press
the zoom controls button again or press any other button.

The zoom control set (numbers 1, 2 and 3, directly above) shows the current
zoom level, the available range of the zoom and allows the user to finely
control the zoom of the camera. The parts of the zoom control set are:

Decrease zoom button “-” (number 1)

Each press of this button will decrease the zoom level 1/10th of
the total zoom range. This has the visual effect of zooming out and seeing
more of the field, but less detail. Once the zoom range reaches the
left-most position in the range, pressing this button will have no effect.

Position slider control (number 2)

This slider represents the total range available for the zoom. The position
of the round button represents the current zoom level that is being
displayed. Pressing and dragging the round button left or right will change
the zoom level. Drag left to zoom out. Drag right to zoom in.

Increase zoom button “+” (number 3)

Each press of this button will increase the zoom level 1/10th of
the total zoom range. This has the visual effect of zooming in and seeing
less of the field, but more detail. Once the zoom range reaches the
right-most position in the range, pressing this button will have no effect.

Utilizing the zoom is a convenient way to view detail or view a larger
amount of the field without moving the camera. However, it is important to
note that the effect of the extremes of the zoom can make changing the view
or moving or around the field (by the on-screen joysticks or mouse)
visually confusing. When zoomed all the way in, the camera will appear to
move/pan very quickly. Additionally, when zoomed all the way out, the
camera will appear to move/pan very slowly, but have a fish-eye effect. In
both instances, the camera is moving/panning at the same speed. Keeping the
zoom level in the mid-range while moving/panning produces the most visually
appealing effect.

Camera Views Menu

Pressing the camera views button (number 2, in the Controls Overview section) will display a pop-up menu that
contains a list of camera views that are available. Selecting an item from
this menu will move the camera to the location and the view described by
the menu item. Pressing and sliding a finger up and down in the menu area
will reveal additional items, if the entire list is not visible. To
deactivate the pop-up menu, press the camera views button again, select a
view from the menu or press any other button.

Contained in this menu are several default views of the field that will
appear with every drill. The names and descriptions of the default views
can be seen in the displayed menu view, directly above. Additionally,
depending on the drill, there may be camera drill-specific views that show
the drill, as the coach would like it viewed. These help the coach and
player focus on key elements of the drill.

As a note, selecting one of the views will also reset the camera zoom to a
level specific to the view.

In Conclusion

In conclusion, the Zoom Control and Camera Views Menu
help the user view the drill from a multitude of angles and levels of
detail. Additionally, look for drill-specific views to gain additional
insight into the drill, as the coach would like the user to see it.

Get the MOTI Soccer Training app:
MOTI Soccer for Android: https://motisports.com/google-soccer-app/
MOTI Soccer for iOS: https://motisports.com/apple-soccer-app/

Drill Camera Controls

MOTI Mobile Camera Controls for Drills provides the user with dynamic options to review and study drills.  From tracking a player on the field to viewing a drill from overhead to actually being the player, the camera controls provide a multitude of options.

The review of the camera modes will be divided into 4 different parts.  Topics for the 4 parts are:

  1. Motion Controls and Overview (this article) – Part 1 will introduce the motion controls available to the user (finger-gestures and on-screen joysticks) and provide a high-level overview of each of the camera modes.
  2. Pivot-In-Place and Rotate-Around-Location – Part 2 covers two modes that provide a very flexible overview of a drill. As a note, Pivot-In-Place is the default mode when a drill starts.
  3. Follow-Player, Follow-Ball, Track-Player, and Track-Ball – Part 3 will explore the ‘follow’ and ‘tracking’ options. These modes facilitate focusing on specific player/ball in a complex drill.
  4. Top-Down Perspective – Part 4 reviews a viewing-mechanism of the field that will be very familiar with users that play some of the most popular real-time strategy games.

Motion Controls

The motion of the camera can be controlled by finger-gestures and by the on-screen joysticks.

Finger Gestures

Common finger gestures are used with the touchscreen.  The effect of the finger gestures will change based on the camera mode that is selected.  The individual effects will be outlined in the article that contains the camera mode.   The following terms in these articles will be used to describe motion on the touchscreen.  Currently, the finger gestures are:

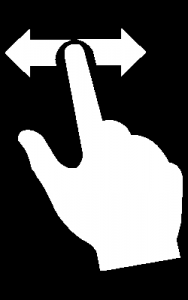
Slide left/right

Single press and hold on the touchscreen then sliding the finger right and left.

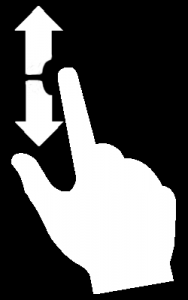
Slide up/down

Single press and hold on the touchscreen then sliding the finger up and down.

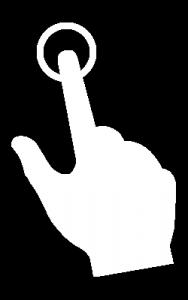
Single Select

Single press and release on the touchscreen.

On-Screen Joysticks

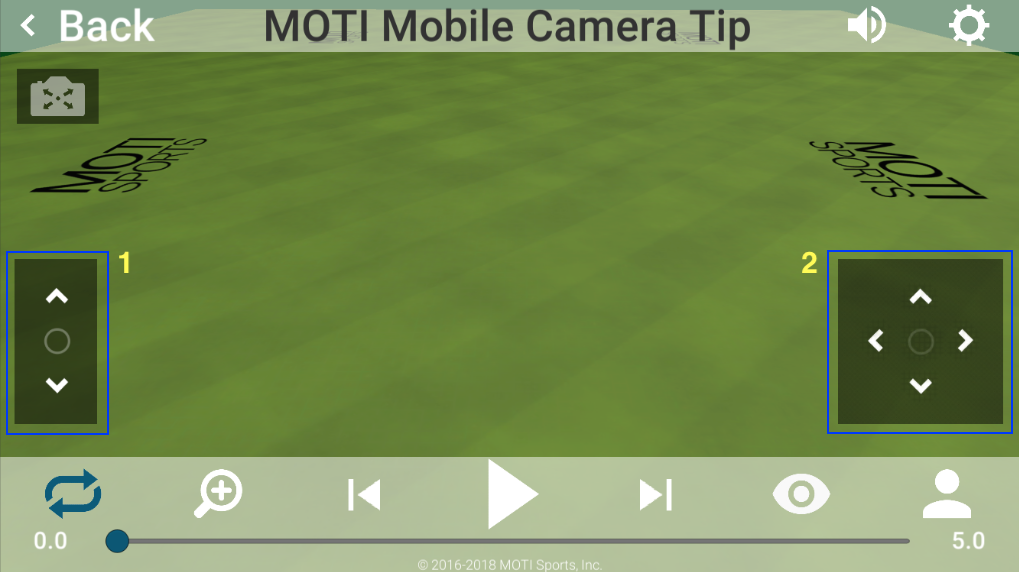
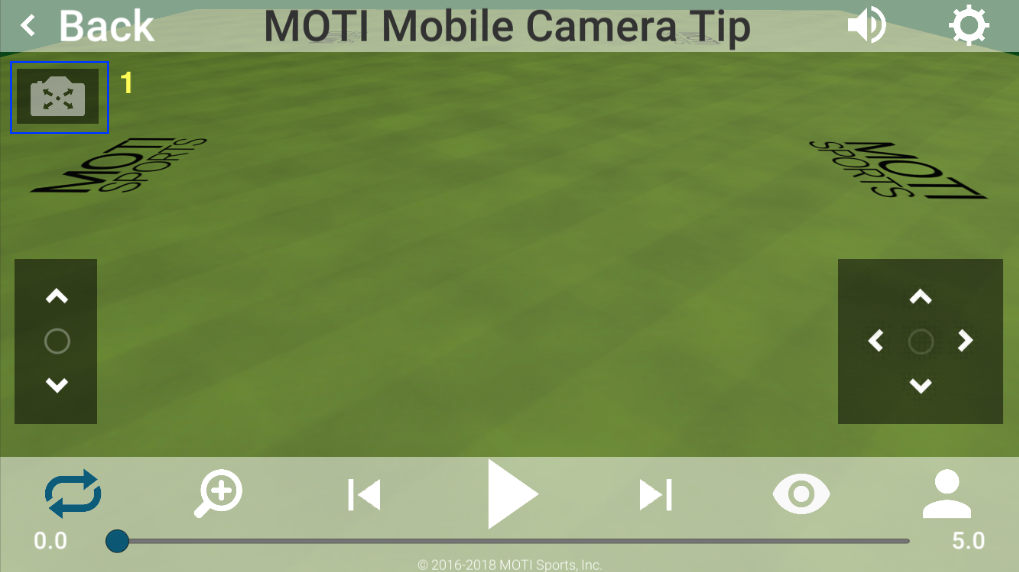
There are two on-screen joysticks that are available, depending on the camera mode.  The effect of the on-screen joysticks will change based on the camera mode, however, the each joystick maintains a specific function.  The two joysticks are Elevation Joystick (see below, yellow #1, outlined in blue) and Location Joystick (see below, yellow #2, outlined in blue).  The image below shows them in their default modes.

Clicking on either of the joystick icons will activate it.  Only one joystick will be active at a time.

Elevation Joystick

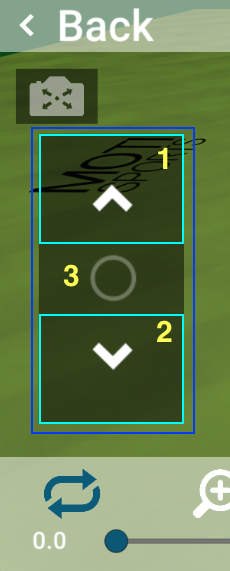
Once the Elevation Joystick is activated, it becomes larger so that it is more easily used.   There are three button areas of this joystick.

  1. Increase Elevation (see above, yellow #1, outlined in light blue) – Pressing the upper part of the joystick will increase the elevation of the camera.
  2. Decrease Elevation (see above, yellow #2, outlined in light blue) – Pressing the bottom part of the joystick will decrease the elevation of the camera.
  3. Close Joystick (see above, yellow #3) – Pressing the center circle of the joystick will close the joystick and put it back into the default joystick mode.

Location Joystick

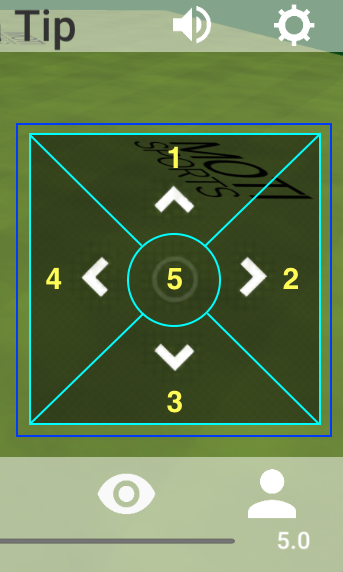
Once the Location Joystick is activated, it becomes larger so that it is more easily used.   There are five button areas of this joystick.

  1. Move Forward (see above, yellow #1, outlined in light blue) – Pressing the upper part of the joystick will move the camera forward (similar to stepping forward in the facing direction).
  2. Move Right (see above, yellow #2, outlined in light blue) – Pressing the right part of the joystick will move the camera to the right (similar to side-stepping right while looking forward).
  3. Move Back (see above, yellow #3, outlined in light blue) – Pressing the upper part of the joystick will move the camera back (similar to stepping back while looking forward).
  4. Move Left (see above, yellow #4, outlined in light blue) – Pressing the left part of the joystick will move the camera to the left (similar to side-stepping left while looking forward).
  5. Close Joystick (see above, yellow #5, in the center) – Pressing the center circle of the joystick will close the joystick.

Camera Modes Menu

The camera controls are activated through the camera mode button located near the top left corner of the drills screen (see below, yellow #1, outlined in blue).

Pressing the camera mode button will activate a slide-out menu with all the camera modes that are available (see below).   To change the camera mode, simply reactive the menu and select a new mode.

Camera Modes

The five camera modes available are:

Pivot-In-Place

This camera mode allows the user to easily look around with finger gestures and move with the joystick.  This is the default mode.

Rotate-Around-Location

This camera mode allows the user to rotate around a single location on the field.  When this mode is picked the user will be asked to Single-Select a point on the field.  Once the point is selected (called the rotation-point), the mode is active.  Finger-gestures and joysticks will be used to move the camera.

Follow Player/Ball

In this camera mode the camera will follow a player or ball as the player or ball moves on the field.  The camera acts as if it is attached to the player or ball.  When this mode is picked, the user will first choose to follow a player or ball (through a new menu) and then will be asked to select the player or ball with a Single-Select.

Track Player/Ball

In this camera mode the camera will track a player or ball as the player or ball moves on the field, without the camera moving.   The camera acts like a stadium camera that follows players or balls.  When this mode is picked, the user will first choose to track a player or ball (through a new menu) and then will be asked to select the player or ball with a Single-Select.

Top Down Perspective

This camera mode tilts the camera to a fixed downward angle.  Finger-gestures and joysticks will be used to move the camera.

Back/Cancel

When this button is pressed, the Camera Mode menu will hide and the camera mode will not be changed.

Summary

In this article, we have covered the motion controls available to the user and given an overview of each of the camera modes.  In subsequent articles, the camera modes will be reviewed in detail.

View Part Two of this article series on App Camera Control here.

Get the MOTI Soccer Training app:
MOTI Soccer for Android: https://motisports.com/google-soccer-app/
MOTI Soccer for iOS: https://motisports.com/apple-soccer-app/

MOTI Tip: Version 2.9.5

MOTI Mobile Version 2.9.5+

With the “I am new to MOTI Sports” new users can simple more into a mode that allows them to experience several 3D Skills and several 3D Drills. Existing users will be directed to enter their password and move on to their Team Page.

Note: When touching the username field, some phone models will open an input line directly over the Copyright statement at the bottom of the screen. Once touched the device keyboard will appear.

New Landing View, once you arrive at your team page after logging in the system you will be viewing a combined Announcement Board and current practice plan on the same page. Saving unnecessary clicks is important.

Additions in App View – As you already know this App has two operating modes. Web View (used when internet connections are available) and App View (used when internet connections are not available).

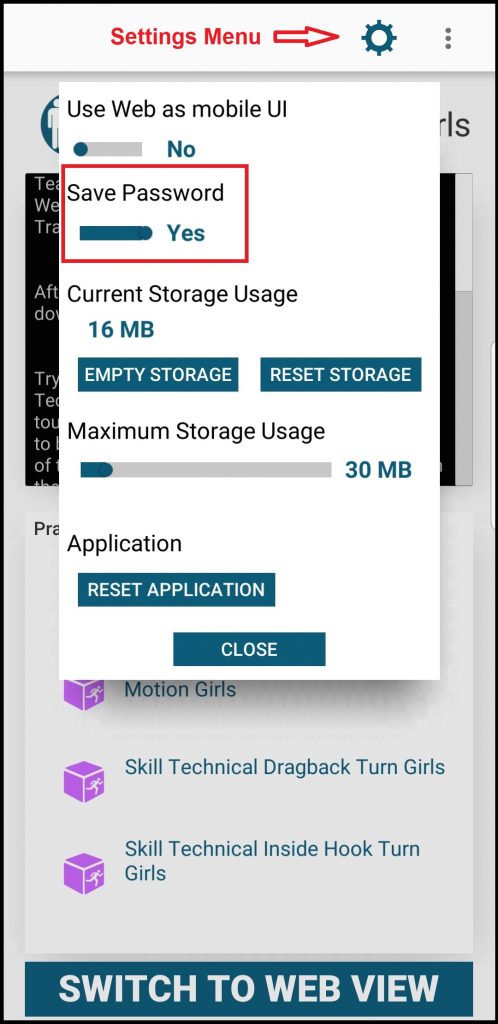
Settings Menu

Save Password – This button when turned to the YES position as it is now displayed with record your password to the system within the app. The next time one logs in, the App will remember your password. Then by simply checking “Remember Me” and with one click of a button you are in the App.

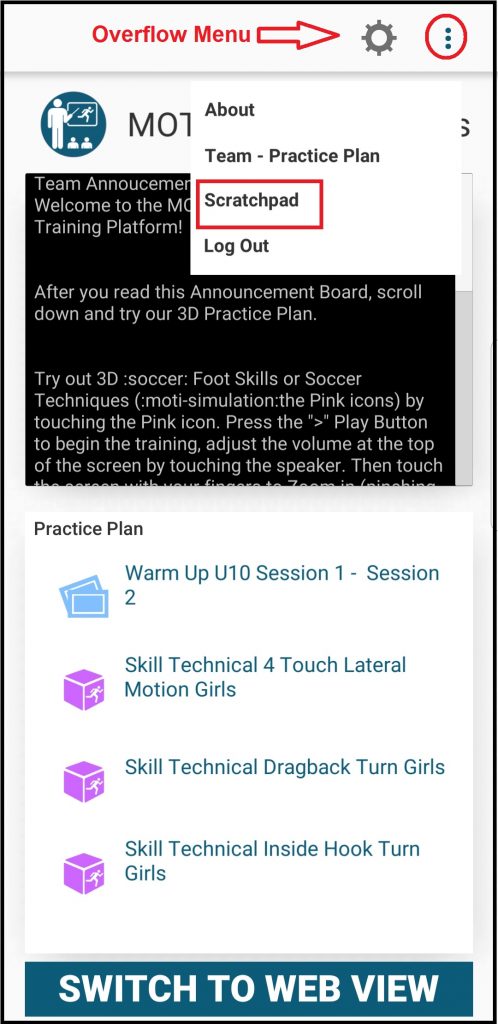
Overflow Menu

Scratch Pad Launch – After Launching the Overflow menu, you can then launch the new Scratch Pad feature by touching the name.

MOTI Tip: Scratchpad

MOTI Soccer (previously known as MOTI Mobile) Scratchpad supplies the user with an easy-to-access drawing surface that can help coaches and players craft new ideas and explain current drills/techniques through drawing.

Accessing the Scratchpad

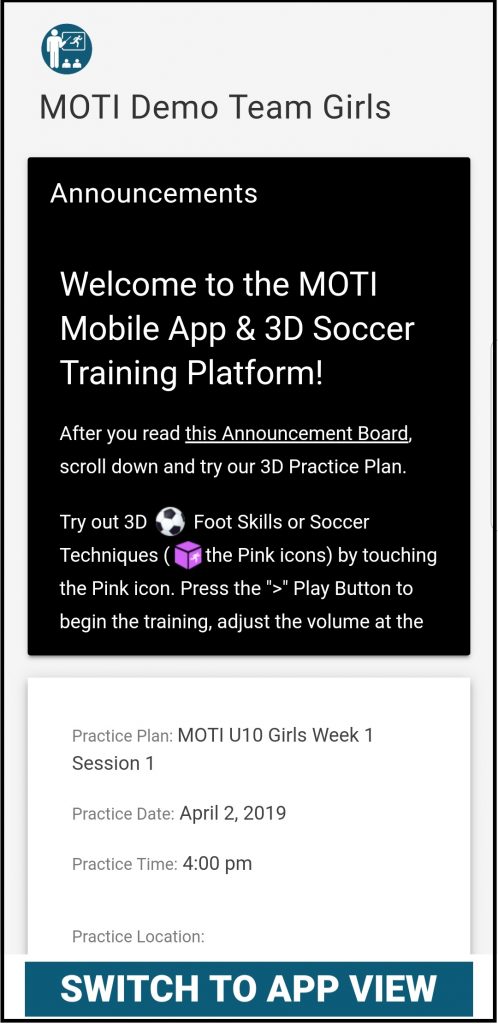
The scratchpad is only available through the mobile app user-interface.  If you are in the mobile app Web interface, you will see a button at the bottom of the screen that is labeled “SWITCH TO APP VIEW”.  Press this button to enter the mobile app user-interface.

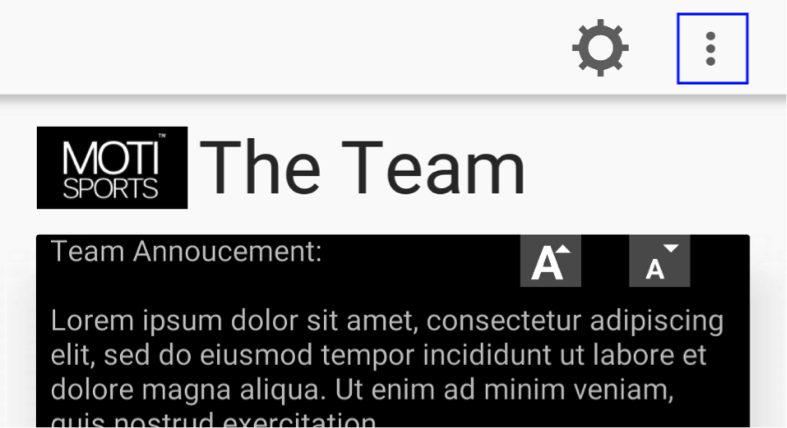
The scratchpad is activated through the Main Menu in the mobile app user-interface.  Press the 3-Dot Button at the top-right of the screen (see below, outlined in blue) to activate the Main Menu.

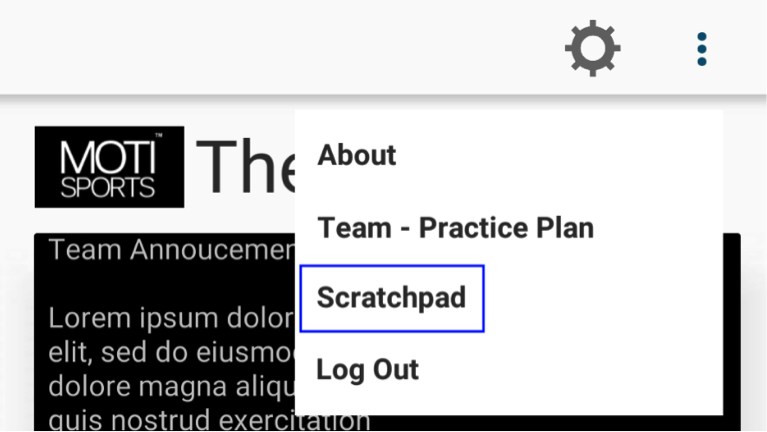
Once the Main Menu is open, select the Scratchpad menu item (see below, outlined in blue) to activate the scratchpad.

Scratchpad Overview

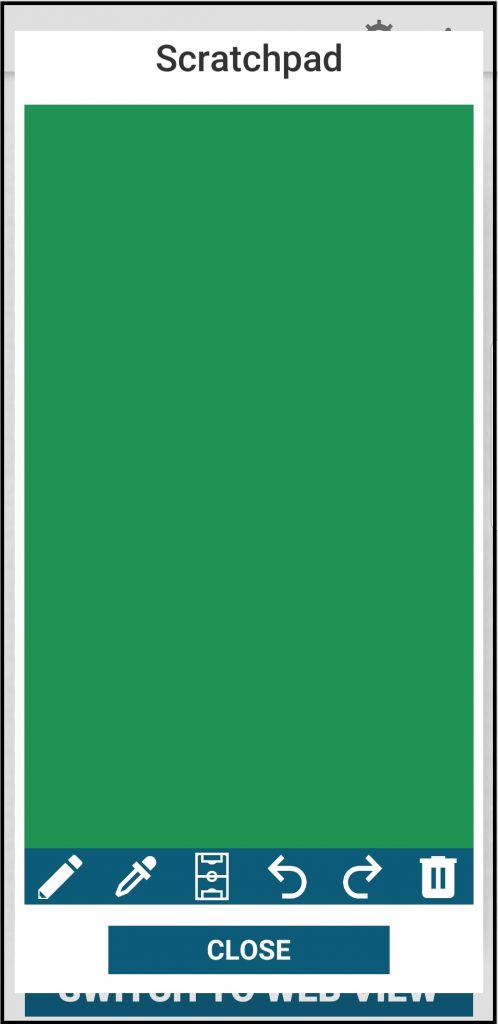
Once the scratchpad is activated, it will cover the majority of the screen and must be closed in order to perform any other functions.  

Drawing Area

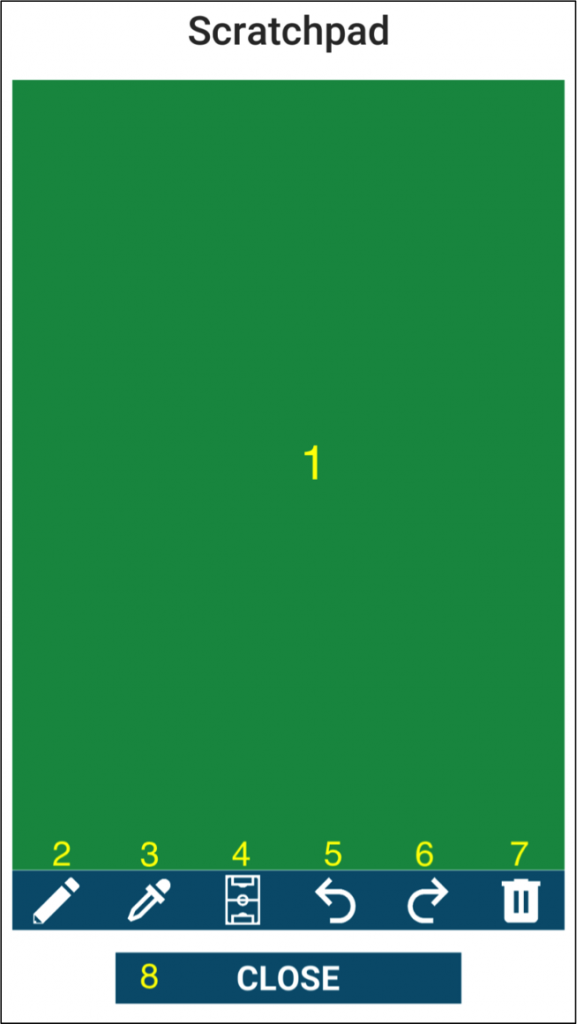
By default, the Drawing Area (see below, yellow #1) will be a solid green color. 

Drawing is accomplished by using you finger.  Press a finger on the screen in the Drawing Area, hold down the same finger down and move the same finger in order to draw lines.

Pencil Size

The Pencil Size Button (yellow #2, above) will bring up the Pencil Size Menu.  The user can choose the thickness of the pencil used by pressing one of the icons in the pop-up menu.  The thinnest pencil size is on the left and the thickest pencil size is on the right.  All lines drawn after the size is changed will be drawn in the chosen size.  Historical line sizes will not be changed.

Pencil Color

The Pencil Color Button (yellow #3, above) will bring up the Pencil Color Menu (see below).  The user can choose the color of the pencil by pressing one of the color boxes in the pop-up menu.  All lines drawn after the color is changed will be drawn in the chosen color.  Historical line colors will not be changed.

Fields

The Field Chooser Button (see above, yellow #4) will bring up the Field Menu.  The user can apply a field to the Drawing Area by selecting one of the icons in the menu.   This provides an easy mechanism to apply field lines to the Drawing Area.

Note: Selecting a field will clear the Drawing Area of all lines before the field lines are applied.  This cannot be undone.

Undo/Redo

The Undo Button (see above, yellow #5) and Redo Button (see above, yellow #6) give the user the ability to undo and redo draw-actions.  A draw-action is one finger-down/finger-move/finger-up sequence.  The maximum number of draw-actions that will be recorded is 10.  Therefore, the maximum number of undo’s and redo’s is 10. 

Note: After an undo, if a new line is drawn, the redo history will be cleared.

Trash

The Trash Button (see above, yellow #7) will clear the Drawing Area of all lines.  An empty green Drawing Area will be shown (see above, yellow #1).

Note: Using the trash cannot be undone.

Closing

Closing the scratchpad is accomplished by pressing the Close Button (see above, yellow #8).   Once closed, the user will be returned to the practice plan.

The scratchpad does not provide saving/loading options, but will remember what has been drawn in certain circumstances.  The following is the list of workflows that will remember or clear the Drawing Area.

  • Remembering Drawing Area
    • Closing the scratchpad and returning to the practice plan
    • Closing the scratchpad and viewing the Web interface
    • Viewing techniques
    • Viewing drills
  • Clearing Drawing Area
    • Launching the application
    • Logging in
    • Logging out
    • Using the Trash Button

Conclusion

The scratchpad provides coaches and players an easy way to draw-out ideas, concepts and instructions by simply using a finger.

Get the FREE MOTI Soccer app for Android and iOS


MOTI Tip: What does the App do, and why should I use it?

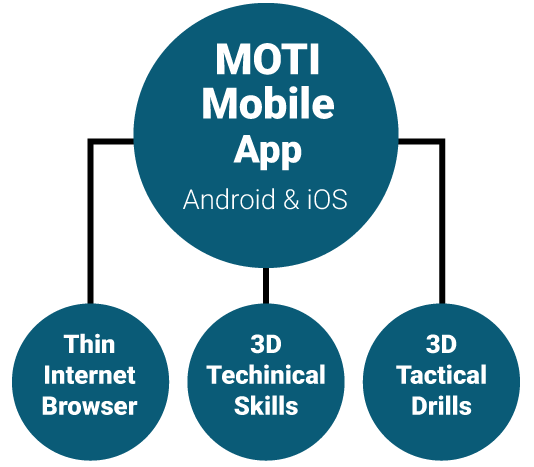
The MOTI Soccer App is a free, but very powerful App designed to work with our cloud based platform motisports.com/app) and provides a real time 3D viewing experience of our 3D Skills and 3D Drills. The MOTI Soccer App (previously known as MOTI Mobile) has three functional components.

  • Thin Internet Browser – This provides direct viewing of the Coachspage.com information, it eliminates players and coaches from “wondering around” the internet thus providing a safe & secure environment for youth to use.
  • 3D Technical Skills – This plays the 3D Technical Skills (Foot Skills) allowing the coach or player to rotate around the Skill being demonstrated,from any viewing perspective in the Mobile App via a gaming engine technology (in the future this will lead in the future to a better visual learning experience). This method enhances visual learning while significantly reducing or entirely eliminating “data streaming” which uses up your mobile data plan. It is much simpler to ship a very small file than it is to stream a large video stream.
  • 3D Tactical Skills – This plays the 3D Tactical Drills (activities, simulations) and allows the player or coach to rotate and view the drill / activity / simulation from any perspective needed to comprehend the drill. This is implemented in a gaming engine technology, which in the future will provide for significant enhancement of viewing and understanding.

Two items to note. First when viewing a 3D element (Skill or Drill) once it has been viewed, it will not be downloaded again (as it is already located with in the app), unless the MOTI Soccer App is reset. Second the re-flash of the MOTI Blue Logo Screen that you see between viewing the Practice Plan and viewing a 3D Skill or Drill, is simply the app, refreshing the contents of the Thin Internet Browser.

MOTI Tip: Drill Camera Controls

MOTI Soccer Camera Controls for Drills provides the user dynamic options to review and study drills.  From tracking a player on the field to viewing a drill from overhead to actually being the player, the camera controls provide a multitude of options.

The review of the camera modes will be divided into 4 different parts.  Topics for the 4 parts are:

  1. Motion Controls and Overview (this article) – Part 1 will introduce the motion controls available to the user (finger-gestures and on-screen joysticks) and provide a high-level overview of each of the camera modes.
  2. Pivot-In-Place and Rotate-Around-Location – Part 2 covers two modes that provide a very flexible overview of a drill. As a note, Pivot-In-Place is the default mode when a drill starts.
  3. Follow-Player, Follow-Ball, Track-Player and Track-Ball – Part 3 will explore the ‘follow’ and ‘tracking’ options. These modes facilitate focusing on specific player/ball in a complex drill.
  4. Top-Down Perspective – Part 4 reviews a viewing-mechanism of the field that will be very familiar with user that play some of the most popular real-time strategy games.

Motion Controls

The motion of the camera can be controlled by finger-gestures and by the on-screen joysticks.

Finger Gestures

Common finger gestures are used with the touchscreen.  The effect of the finger gestures will change based on the camera mode that is selected.  The individual effects will be outlined in the article that contains the camera mode.   The following terms in these articles will be used to describe motion on the touchscreen.  Currently, the finger gestures are:

Slide left/right

Single press and hold on the touchscreen then sliding the finger right and left.

Slide up/down

Single press and hold on the touchscreen then sliding the finger up and down.

Single Select

Single press and release on the touchscreen.


On-Screen Joysticks

There are two on-screen joysticks that are available, depending on the camera mode.  The effect of the on-screen joysticks will change based on the camera mode, however, the each joystick maintains a specific function.  The two joysticks are Elevation Joystick (see below, yellow #1, outlined in blue) and Location Joystick (see below, yellow #2, outlined in blue).  The image below shows them in their default modes.


 Clicking on either of the joystick icons will activate it.  Only one joystick will be active at a time.

Elevation Joystick

Once the Elevation Joystick is activated, it becomes larger so that it is more easily used.   There are three button areas of this joystick.

  1. Increase Elevation (see above, yellow #1, outlined in light blue) – Pressing the upper part of the joystick will increase the elevation of the camera.
  2. Decrease Elevation (see above, yellow #2, outlined in light blue) – Pressing the bottom part of the joystick will decrease the elevation of the camera.
  3. Close Joystick (see above, yellow #3) – Pressing the center circle of the joystick will close the joystick and put it back into the default joystick mode.

Location Joystick

Once the Location Joystick is activated, it becomes larger so that it is more easily used.   There are five button areas of this joystick.


  1. Move Forward (see above, yellow #1, outlined in light blue) – Pressing the upper part of the joystick will move the camera forward (similar to stepping forward in the facing direction).
  2. Move Right (see above, yellow #2, outlined in light blue) – Pressing the right part of the joystick will move the camera to the right (similar to side-stepping right while looking forward).
  3. Move Back (see above, yellow #3, outlined in light blue) – Pressing the upper part of the joystick will move the camera back (similar to stepping back while looking forward).
  4. Move Left (see above, yellow #4, outlined in light blue) – Pressing the left part of the joystick will move the camera to the left (similar to side-stepping left while looking forward).
  5. Close Joystick (see above, yellow #5, in the center) – Pressing the center circle of the joystick will close the joystick.


 Camera Modes Menu

The camera controls are activated through the camera mode button located near the top left corner of the drills screen (see below, yellow #1, outlined in blue).

Pressing the camera mode button will activate a slide-out menu with all the camera modes that are available (see below).   To change the camera mode, simply reactive the menu and select a new mode.

Camera Modes

The five camera modes available are:

Pivot-In-Place

This camera mode allows the user to easily look around with finger gestures and move with the joystick.  This is the default mode.

Rotate-Around-Location

This camera mode allows the user to rotate around a single location on the field.  When this mode is picked the user will be asked to Single-Select a point on the field.  Once the point is selected (called the rotation-point), the mode is active.  Finger-gestures and joysticks will be used to move the camera.

Follow Player/Ball

In this camera mode the camera will follow a player or ball as the player or ball moves on the field.  The camera acts as if it is attached to the player or ball.  When this mode is picked, the user will first choose to follow a player or ball (through a new menu) and then will be asked to select the player or ball with a Single-Select.

Track Player/Ball

In this camera mode the camera will track a player or ball as the player or ball moves on the field, without the camera moving.   The camera acts like a stadium camera that follows players or balls.  When this mode is picked, the user will first choose to track a player or ball (through a new menu) and then will be asked to select the player or ball with a Single-Select.

Top Down Perspective

This camera mode tilts the camera to a fixed downward angle.  Finger-gestures and joysticks will be used to move the camera.

Back/Cancel

When this button is pressed, the Camera Mode menu will hide and the camera mode will not be changed.

Summary

In this article, we have covered the motion controls available to the user and given an overview of each of the camera modes.  In subsequent articles, the camera modes will be reviewed in detail.

View Part Two of this article series on App Camera Control here.

MOTI Tip: Drill Controls – Part 3 of 3

Welcome back to the 3-part series on MOTI Soccer drill controls. In this article the Drill Effects will be reviewed and explained. Utilizing these features, viewing and tracking the motion in the play is improved by the use of on-field annotation.

To recap, the review of the drill controls are divided into 3 parts. Topics for the 3 parts are:

  1. Animation Controls and Overview – Part 1 introduced the main
    control panel, the animation controls and the menu/control-panel buttons.
  2. Zoom Controls and Camera Views Menu– Part 2 covered both the
    zoom controls and the camera view menu that help with viewing the drill in different ways.
  3. 3) Drill Effects (this article) – Part 3 covers the drill effects
    that are available to help visualize the workings of the drill.

Review

The first article introduced layout of the drill controls in the panel and described the functionality of each of the buttons and controls. The content of the this article will be used as a basis of this article. Read the first article if these concepts are unfamiliar or a refresher is needed.

The second article reviewed the Zoom Controls and Camera Views Menu menu. Read the first article if these concepts
are unfamiliar or a refresher is needed.

Controls Overview

As described in the first article, the drill controls are located at the
bottom of the screen and are always on-screen. The follow sections will refer to the image below using both the icon and the numbers for identification.

Drill Effects

Pressing drill effects button (number 1, in the Controls Overview section) will activate a pop-up control where the drill effects can be activated and colored. Each setting is applied immediately to the scene. To deactivate the pop-up control, press the drill effects button again or press any other button.

When the application is first installed, all the settings for the drill effects are off and set to the color black (see the above image). Changing the on/off state and color is fully customizable by the user and will be remembered between viewing different.

On/Off States

Each of the buttons (e.g. Show, Routes, Trails) is a toggle switch. Pressing on a one of the buttons will toggle the state of the effect off->on or on->off.

Off State – Below is the “off” state of a Routes button

On State – Below is the “on” state of a Routes button

Display Color

Each of the gray-bordered boxes next to the on/off state toggle switches is a button that will launch the Color Picker (see the follow section for more information). In the above image, all the colors are black.

Color Picker Button

The following explanations will reference the two images directly below.

The following are the effects that can be configured:

Featured Players and Featured Balls

Featured players/balls are defined by the author of the drill and are intended to show specific player/ball movements. The settings for “featured” players/balls supersede any settings for “all” player/balls.

Show option

When activated, a dais will appear beneath the player/ball and will move as the player/ball moves. The dais will always be attached to the ground (even if the ball is kicked in the air or the player jumps). Note that not all drills will have featured players or featured balls.

An example of a featured player is shown below with the Show option “on” and colored in “red”.

Routes and Trails options

These options will be reviewed in the “All Players and All Balls” section directly below.

All Players and All Balls

These settings will apply to all the players and all the balls in the scene (unless the options are superseded by the Featured Players or Featured Balls).

Routes option

This option will display the immediate past and the immediate future paths of the scripted player/ball as they move. In the above images, in the Drill Effects Pop-Up, the routes for the players are
turned “on” and have a turquoise color. The routes can be seen on the ground around the players.

Trails option

This option will display where the player/ball has been and will follow the player/ball as it moves. When a player/ball stops, the trail will disappear shortly thereafter. In the above images, in the Drill Effects Pop-Up, the trails for the balls are turned “on” and have a purplish color. The trails can be seen on the ground around the ball.

Color Picker

When one of the gray-bordered color squares in theDrill Effects Pop-Up is pressed the Color Picker Pop-Up will show. To dismiss
the Color Picker Pop-Up, press the “Cancel” button to discard the changes, or “OK” to keep the changes.

The color picker control set (numbers 1 through 6, directly above) shows the current color of the effect chosen. The parts of the color picker set are:

Title (number 1)

The title shows the effect that is being edited.

Saturation control (number 2)

Pressing anywhere in the colored area will change the color to be more or less intense (without changing the Hue). The Saturation marker (see 6, below) reflects the current setting.

Hue control (number 3)

Pressing anywhere in the rainbow area will change the color to be in a different area (without changing the Saturation). The Hue maker (see 7, below) reflects the current setting.

Cancel button (number 4)

Pressing this will close the pop-up and discard the changes that were made.

OK button (number 5)

Pressing this will close the pop-up and apply the changes that were made. The changes will be applied to the drill and will be reflected in both the drill and the color square next to the effect name (e.g. Show, Routes, Trails).

Saturation marker (number 6)

This marker shows the current saturation that is being displayed.

Hue marker (number 6)

This marker shows the current hue that is being displayed.

In Conclusion

The Drill Effects provide the user an improved
understanding of the motion of drill. Adjust the colors and state of the effects to pinpoint specific movements and players or balls.

View Part Two of Drill Controls here.