
Welcome back to the 3-part series on MOTI Mobile drill controls. In this article the Drill Effects will be reviewed and explained. Utilizing these features, viewing and tracking the motion in the play is improved by the use of on-field annotation.
To recap, the review of the drill controls are divided into 3 parts. Topics for the 3 parts are:
- Animation Controls and Overview – Part 1 introduced the main
control panel, the animation controls and the menu/control-panel buttons. - Zoom Controls and Camera Views Menu– Part 2 covered both the
zoom controls and the camera view menu that help with viewing the drill in different ways. - Drill Effects (this article) – Part 3 covers the drill effects
that are available to help visualize the workings of the drill.
Review
The first article introduced layout of the drill controls in the panel and described the functionality of each of the buttons and controls. The content of the this article will be used as a basis of this article. Read the first article if these concepts are unfamiliar or a refresher is needed.
The second article reviewed the Zoom Controls and Camera Views Menu menu. Read the first article if these concepts
are unfamiliar or a refresher is needed.
Controls Overview
As described in the first article, the drill controls are located at the
bottom of the screen and are always on-screen. The follow sections will refer to the image below using both the icon and the numbers for identification.

Drill Effects

Pressing drill effects button (number 1, in the Controls Overview section) will activate a pop-up control where the drill effects can be activated and colored. Each setting is applied immediately to the scene. To deactivate the pop-up control, press the drill effects button again or press any other button.
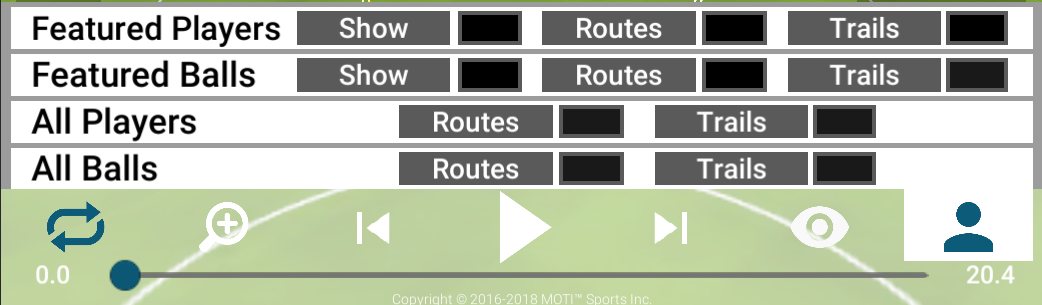
When the application is first installed, all the settings for the drill effects are off and set to the color black (see the above image). Changing the on/off state and color is fully customizable by the user and will be remembered between viewing different.
On/Off States
Each of the buttons (e.g. Show, Routes, Trails) is a toggle switch. Pressing on a one of the buttons will toggle the state of the effect off->on or on->off.
Off State – Below is the “off” state of a Routes button

On State – Below is the “on” state of a Routes button

Display Color
Each of the gray-bordered boxes next to the on/off state toggle switches is a button that will launch the Color Picker (see the follow section for more information). In the above image, all the colors are black.
Color Picker Button

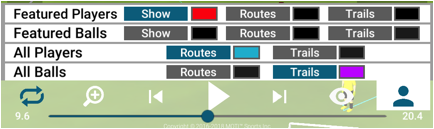
The following explanations will reference the two images directly below.
The following are the effects that can be configured:
Featured Players and Featured Balls
Featured players/balls are defined by the author of the drill and are intended to show specific player/ball movements. The settings for “featured” players/balls supersede any settings for “all” player/balls.
Show option
When activated, a dais will appear beneath the player/ball and will move as the player/ball moves. The dais will always be attached to the ground (even if the ball is kicked in the air or the player jumps). Note that not all drills will have featured players or featured balls.
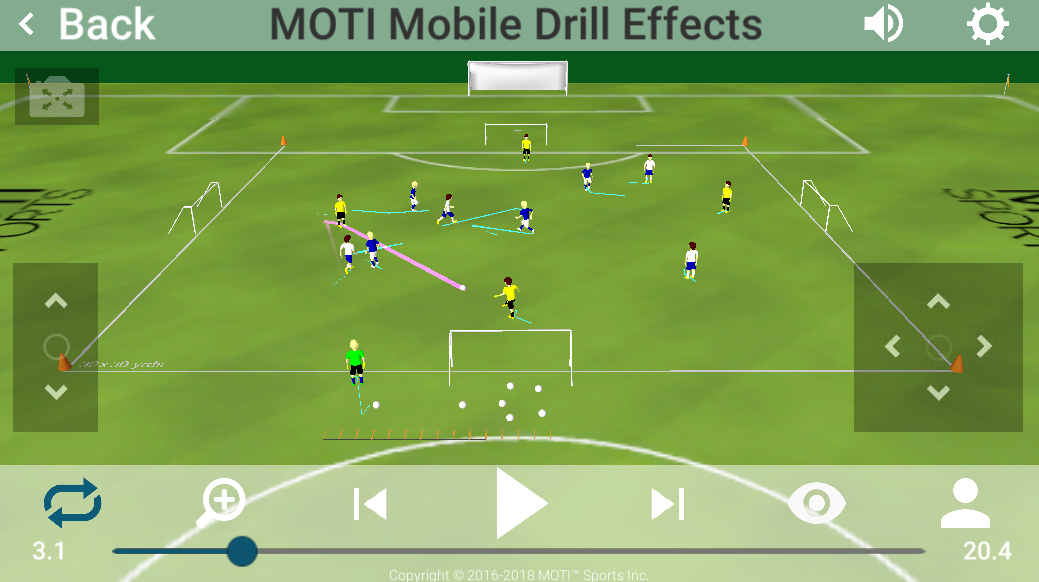
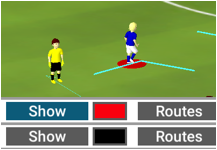
An example of a featured player is shown below with the Show option “on” and colored in “red”.
Routes and Trails options
These options will be reviewed in the “All Players and All Balls” section directly below.
All Players and All Balls
These settings will apply to all the players and all the balls in the scene (unless the options are superseded by the Featured Players or Featured Balls).
Routes option
This option will display the immediate past and the immediate future paths of the scripted player/ball as they move. In the above images, in the Drill Effects Pop-Up, the routes for the players are
turned “on” and have a turquoise color. The routes can be seen on the ground around the players.
Trails option
This option will display where the player/ball has been and will follow the player/ball as it moves. When a player/ball stops, the trail will disappear shortly thereafter. In the above images, in the Drill Effects Pop-Up, the trails for the balls are turned “on” and have a purplish color. The trails can be seen on the ground around the ball.
Color Picker

When one of the gray-bordered color squares in theDrill Effects Pop-Up is pressed the Color Picker Pop-Up will show. To dismiss
the Color Picker Pop-Up, press the “Cancel” button to discard the changes, or “OK” to keep the changes.
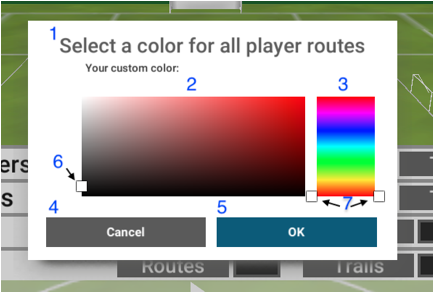
The color picker control set (numbers 1 through 6, directly above) shows the current color of the effect chosen. The parts of the color picker set are:
Title (number 1)
The title shows the effect that is being edited.
Saturation control (number 2)
Pressing anywhere in the colored area will change the color to be more or less intense (without changing the Hue). The Saturation marker (see 6, below) reflects the current setting.
Hue control (number 3)
Pressing anywhere in the rainbow area will change the color to be in a different area (without changing the Saturation). The Hue maker (see 7, below) reflects the current setting.
Cancel button (number 4)
Pressing this will close the pop-up and discard the changes that were made.
OK button (number 5)
Pressing this will close the pop-up and apply the changes that were made. The changes will be applied to the drill and will be reflected in both the drill and the color square next to the effect name (e.g. Show, Routes, Trails).
Saturation marker (number 6)
This marker shows the current saturation that is being displayed.
Hue marker (number 6)
This marker shows the current hue that is being displayed.
In Conclusion
The Drill Effects provide the user an improved
understanding of the motion of drill. Adjust the colors and state of the effects to pinpoint specific movements and players or balls.
Get the MOTI Soccer Training app: ![]() MOTI Soccer for Android: https://motisports.com/google-soccer-app/
MOTI Soccer for Android: https://motisports.com/google-soccer-app/![]() MOTI Soccer for iOS: https://motisports.com/apple-soccer-app/
MOTI Soccer for iOS: https://motisports.com/apple-soccer-app/

I have been working on MOTI Sports software since 2010. I work on enhancements to the 3DST 3D Coaching Play Simulation tool (3D Playbook) and I am the author of the MOTI Soccer App. Prior to joining MOTI, I worked on a variety of animation and visual programming including 3D flight simulator for Hughes Aircraft.